기계 번역으로 제공되는 번역입니다. 제공된 번역과 원본 영어의 내용이 상충하는 경우에는 영어 버전이 우선합니다.
섀도우 변형을 사용한 모델 테스트
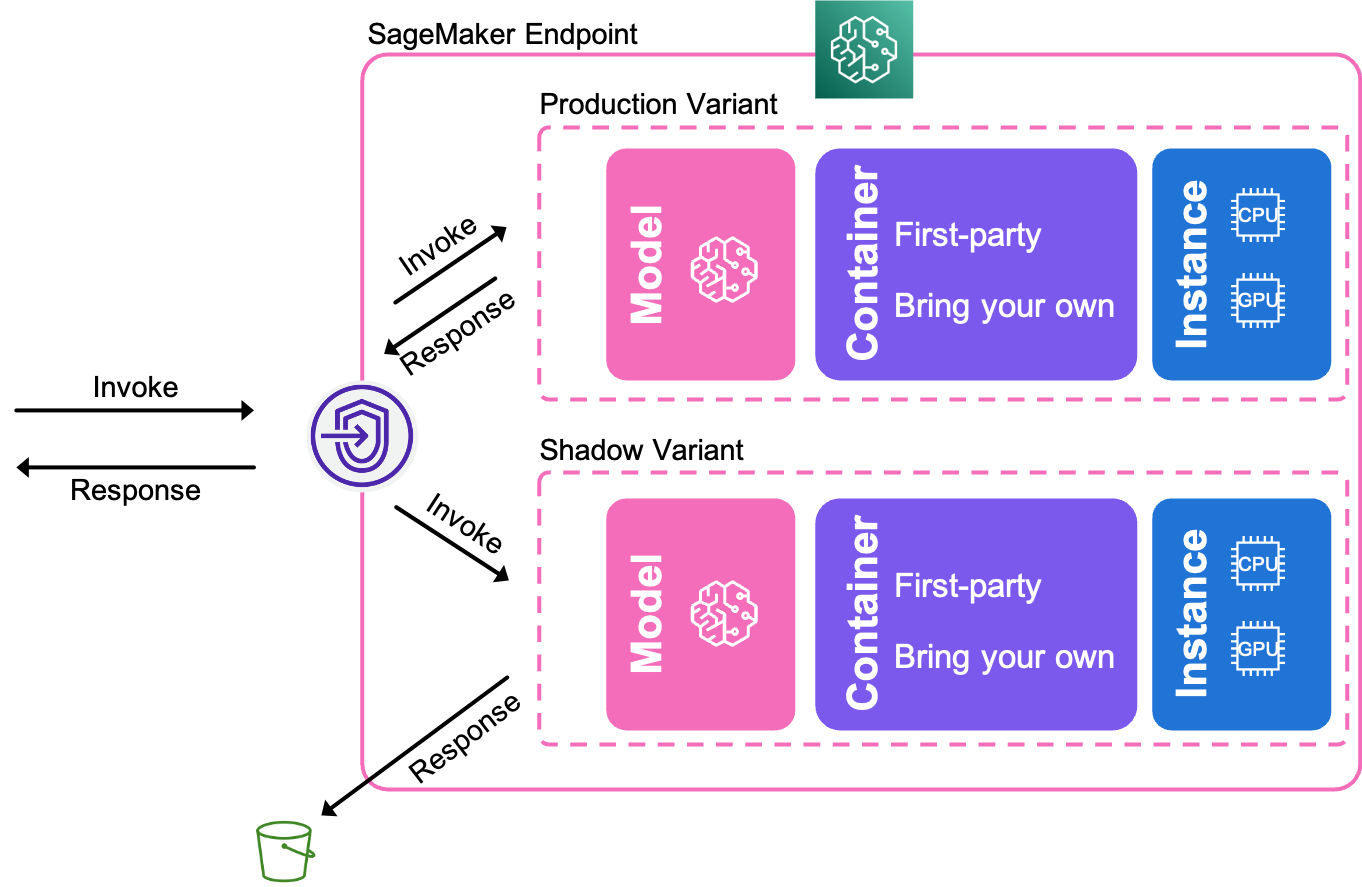
SageMaker AI 모델 섀도우 배포를 사용하여 장기 실행 섀도우 변형을 만들면 프로덕션으로 승격하기 전에 모델 제공 스택의 새로운 후보 구성 요소를 검증할 수 있습니다. 다음 다이어그램은 섀도우 변형의 작동 방식을 자세히 보여줍니다.
섀도우 변형 배포
다음 코드 예제는 섀도우 변형을 프로그래밍 방식으로 배포하는 방법을 보여줍니다. 예제의 사용자 자리표시자 텍스트를 본인의 정보로 대체하세요.
-
SageMaker AI 모델 2개를 만듭니다. 하나는 프로덕션 변형용이고 다른 하나는 섀도우 변형용입니다.
import boto3 from sagemaker import get_execution_role, Session aws_region = "aws-region" boto_session = boto3.Session(region_name=aws_region) sagemaker_client = boto_session.client("sagemaker") role = get_execution_role() bucket = Session(boto_session).default_bucket() model_name1 = "name-of-your-first-model" model_name2 = "name-of-your-second-model" sagemaker_client.create_model( ModelName = model_name1, ExecutionRoleArn = role, Containers=[ { "Image": "ecr-image-uri-for-first-model", "ModelDataUrl": "s3-location-of-trained-first-model" } ] ) sagemaker_client.create_model( ModelName = model_name2, ExecutionRoleArn = role, Containers=[ { "Image": "ecr-image-uri-for-second-model", "ModelDataUrl": "s3-location-of-trained-second-model" } ] ) -
엔드포인트 구성 생성. 구성에서 프로덕션과 섀도우 버전을 모두 지정합니다.
endpoint_config_name =name-of-your-endpoint-configcreate_endpoint_config_response = sagemaker_client.create_endpoint_config( EndpointConfigName=endpoint_config_name, ProductionVariants=[ { "VariantName":name-of-your-production-variant, "ModelName": model_name1, "InstanceType":"ml.m5.xlarge", "InitialInstanceCount":1, "InitialVariantWeight":1, } ], ShadowProductionVariants=[ { "VariantName":name-of-your-shadow-variant, "ModelName": model_name2, "InstanceType":"ml.m5.xlarge", "InitialInstanceCount":1, "InitialVariantWeight":1, } ] ) -
엔드포인트를 생성합니다.
create_endpoint_response = sm.create_endpoint(
    EndpointName=name-of-your-endpoint,
    EndpointConfigName=endpoint_config_name,
)
