翻訳は機械翻訳により提供されています。提供された翻訳内容と英語版の間で齟齬、不一致または矛盾がある場合、英語版が優先します。
WhatsApp Business メッセージングを設定する
このセクションのトピックでは、Amazon Connect の WhatsApp Business メッセージングをセットアップしてテストする方法について説明します。AWS End User Messaging Social を使用してWhatsApp ビジネスアカウントと電話番号を Amazon Connect インスタンスにリンクし、リンクされた電話番号を Amazon Connect にインポートします。その後、お客様は WhatsApp を使用してコールセンターにメッセージを送信できます。
Amazon Lex を使用して、顧客の質問への応答を自動化することもできます。これにより、エージェントの時間と労力を節約できます。詳細については、Amazon Lex デベロッパーガイド」の「Amazon Lex の開始方法」を参照してください。 Amazon Lex
内容
前提条件
WhatsApp を Amazon Connect と統合する前に、次の項目が必要です。
-
WhatsApp ビジネスアカウント。
-
WhatsApp の電話番号。WhatsApp Business メッセージングの Meta の電話番号検証プロセスを完了するには、番号が音声通話または SMS テキストメッセージを受信できる必要があります。Amazon Connect の音声番号または WhatsApp AWS End User Messaging SMS の電話番号を使用できます。 WhatsApp 所有している電話番号を外部で使用することもできます AWS。
Amazon Connect の音声番号または AWS End User Messaging SMS 番号を使用する場合は、サービスの中断を避けるため、ライブ音声または SMS トラフィックでは使用されない新しい番号を取得することをお勧めします。
AWS End User Messaging Social コンソールは、https://https://console.aws.amazon.com/social-messaging/
://https://www./www.com で WhatsApp Business Account と電話番号を作成することができます。詳細については、AWS エンドユーザーメッセージングソーシャルユーザーガイドのWhatsApp へのサインアップ」を参照してください。
重要
WhatsApp には、完了までに最大 2 週間かかる自動ビジネス検証プロセスがあります。このプロセスは早期に開始することをお勧めします。WhatsApp WhatsApp ビジネスポリシーに違反した場合、またはビジネス ID を検証できない場合、WhatsApp は WhatsApp ビジネスアカウントを無効にすることができます。
また、WhatsApp リソースを作成してリンクする前に、AWS End User Messaging Social のベストプラクティスと WhatsApp のベストプラクティスを確認することを強くお勧めします。 WhatsApp
アカウントと電話番号を作成したら、以下のセクションのステップをリストされた順序で実行します。
ステップ 1: イベント送信先として Amazon Connect を有効にする
次の手順では、AWS End User Messaging Social を使用して、リンクされた WhatsApp Business アカウントのイベント送信先として Amazon Connect を有効にする方法について説明します。これにより、システムは WhatsApp 電話番号をインポートできます。
AWS エンドユーザーメッセージングソーシャルコンソール
次の手順では、 コンソールの使用方法を説明します。
コンソールを使用するには
-
「httpshttps://console.aws.amazon.com/social-messaging/
.com で AWS エンドユーザーメッセージングソーシャルコンソールにサインインします。 -
ナビゲーションペインで、WhatsApp Business アカウントを選択し、目的のアカウントを選択します。
-
イベント送信先タブで、送信先の編集を選択します。
-
送信先タイプで、Amazon Connect を選択します。
-
Connect インスタンスの場合は、ドロップダウンリストから Amazon Connect インスタンスを選択します。
-
ロール ARN で、メッセージとイベントの配信と電話番号のインポートのアクセス許可を付与する IAM ロールを選択します。IAM ポリシーの例については、AWS End User Messaging Social ユーザーガイドの「AWS End User Messaging Social へのメッセージとイベントの宛先の追加」を参照してください。
-
[Save changes] (変更の保存) をクリックします。
これにより、電話番号を Amazon Connect にインポートするプロセスが開始されます。
オペレーションが完了すると、Amazon Connect 管理ウェブサイトに番号が表示されます。
番号を表示するには
-
ナビゲーションペインで、Channels、電話番号を選択します。
Active Channels 列には、すべての WhatsApp 番号の WhatsApp が表示されます。

-
ステップ 2: 電話番号にインバウンド問い合わせフローを設定する
WhatsApp 電話番号で使用するインバウンド問い合わせフローを作成することも、既存のフローを再利用することもできます。フローを再利用する場合は、CheckContactAttributeブロックを追加し、フローの分岐を有効にできます。ブロックを使用すると、WhatsApp の連絡先を特定のキューに送信したり、別のアクションを実行したりできます。
インタラクティブメッセージやリッチリンクプレビューなど、問い合わせフローの構築の詳細については、このセクションのAmazon Connect での WhatsApp Business メッセージング機能と制限後半の「」を参照してください。
以下の一連のステップでは、インバウンド問い合わせフローを設定し、フローにCheckContactAttributeブロックを追加する方法について説明します。
フローを設定するには
-
Amazon Connect コンソールを https://console.aws.amazon.com/connect/
://https://https://https://https://https://https:// -
ナビゲーションペインで、チャネル、電話番号を選択します。
-
WhatsApp 番号を選択し、編集を選択します。
-
Flow/IVR で、更新したフローを選択します。

-
[Save] を選択します。
CheckContactAttribute ブロックを追加するには
-
前のセクションのステップ 1~4 に従います。
-
フローのプロパティページを開きます。
-
チェックする属性セクションで、名前空間をセグメント属性に設定し、キーをサブタイプに設定します。セグメント属性の詳細については、このガイドの後半にあるSegmentAttributes「」を参照してください。
-
チェックの条件セクションで、条件を等号に設定し、値を connect:WhatsApp に設定します。
-
[Save] を選択します。
ステップ 3: テストメッセージを送受信する
このステップでは、問い合わせコントロールパネル (CCP) と携帯電話を使用して、WhatsApp テストメッセージを送受信します。
統合をテストするには
-
CCP でステータスを [利用可能]に設定します。
-
携帯電話で WhatsApp を使用して、前に追加した電話番号を入力して会話を開始します。
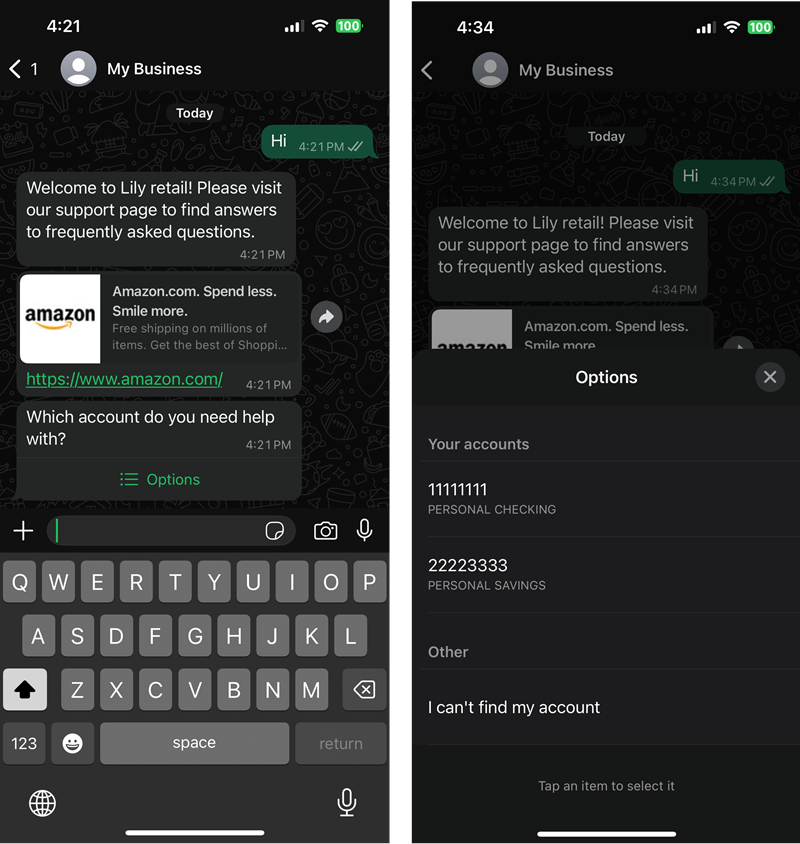
次の図は、 オプションを含むメッセージと、結果のオプションのリストを示しています。

次のステップ: 本番稼働の準備
統合をテストしたら、WhatsApp メッセージングチャネルに次の機能と機能を追加することをお勧めします。
Amazon Connect 機能を追加する
次のリストのリンクをクリックすると、カスタマーおよびエージェントのエクスペリエンスに追加できる Amazon Connect 機能に関する情報が表示されます。
-
顧客が Amazon Connect でチャットの会話を再開できるようにする – 顧客は、コンテキスト、メタデータ、および転送されたトランスクリプトを使用して以前の会話を再開できます。顧客はチャットに戻った際に説明を繰り返す必要がなくなり、エージェントは会話履歴全体にアクセスできます。
-
Amazon Connect でチャットや E メールの連絡先で使用するクイックレスポンスを作成する – 顧客とのチャット中に使用できる一般的な顧客からの問い合わせに対して、エージェントに事前に記述された回答を提供します。クイックレスポンスを使用して、エージェントはより迅速に顧客に対応できます。
エントリポイントを追加する
次のリストのリンクから、さまざまなタイプのカスタマーエントリポイントの追加に関する情報にアクセスできます。
-
エントリポイント: リードと顧客をビジネスメッセージングの会話に誘導する 5 つの方法
(WhatsApp ブログ記事) -
QR コード: WhatsApp Business Platform QR コードを管理する
(メタヘルプ記事) -
Click-to-WhatsApp 広告: 広告マネージャーで WhatsApp をクリックする広告を作成する
(メタヘルプ記事)
電話番号に表示名を追加する
顧客が表示する検証済み表示名を追加するには、メタヘルプの「WhatsApp Business の表示名について
トラフィックのスケーリング
WhatsApp 統合にライブトラフィックをオンボードした後、次のクォータをモニタリングすることをお勧めします。
Amazon Connect のクォータ
デフォルトのクォータの詳細とクォータの引き上げについては、「」を参照してくださいAmazon Connect サービスクォータ。
-
インスタンスクォータあたりの同時アクティブチャット数。このクォータのモニタリングについては、「」、「」を参照してくださいCloudWatch を使用した Amazon Connect インスタンスのモニタリング。
-
StartChatContact スロットリングクォータ。
-
SendChatIntegrationEvent スロットリングクォータ。
-
SendIntegrationEventスロットリングクォータ。AWS End User Messaging Social がインバウンド WhatsApp イベントを発行するために使用するアクセス許可のみの API。
エンドユーザーメッセージングソーシャルクォータ
AWS End User Messaging Social は、多数のメッセージング APIs。次の APIs をモニタリングして、1 つ以上のクォータを変更する必要があるかどうかを確認します。リンクをクリックすると、AWS エンドユーザーメッセージングソーシャル API リファレンスが表示されます。
AWS End User Messaging Social クォータの引き上げの詳細については、AWS End User Messaging Social ユーザーガイドの以下のトピックを参照してください。
一般的な問題のトラブルシューティング
次の情報を使用して、WhatsApp 統合の一般的な問題をトラブルシューティングします。
Amazon Connect インスタンスにインポートされた電話番号が表示されない
インポートした番号が Amazon Connect 管理ウェブサイトに表示されない場合は、次の手順に従います。
-
イベント送信先 IAM ロールに必要なアクセス許可があることを確認します。詳細については、「ステップ 1: イベント送信先として Amazon Connect を有効にする」を参照してください。
-
インスタンスあたりの電話番号のクォータを引き上げる必要があるかどうかを確認します。詳細については、「Amazon Connect サービスクォータ」を参照してください。
-
リンクされた WhatsApp Business Account を別の Amazon Connect インスタンスに再割り当てするには、最初に元の Amazon Connect インスタンスからインポートされた電話番号を解放する必要があります。電話番号がリリースされたら、リンクされた WhatsApp Business アカウントのイベント送信先を別の Amazon Connect インスタンスに更新できます。
重要
ライブカスタマートラフィックを処理する番号をリリースしないでください。代わりに、新しい電話番号を申請します。
-
インポートの問題の原因を特定するには、CloudTrail ログで
ImportPhoneNumberイベントを検索し、エラーの詳細を確認します。ImportPhoneNumber呼び出しが成功すると、DescribePhoneNumberを呼び出して他のエラーの詳細を確認できます。
顧客からのインバウンドメッセージは配信されません
WhatsApp インバウンドメッセージ配信が停止した場合は、 AWS CloudTrail ログでエラーの詳細を検索SendIntegrationEventしSendChatIntegrationEvent、
以下の一般的なシナリオを確認することもできます。
-
AWS End User Messaging Social のリンクされた WhatsApp Business Account で Amazon Connect イベント送信先が有効になっていることを確認します。
-
イベント送信先の IAM ロールに必要なアクセス許可があることを確認します。詳細については、このセクションの前ステップ 1: イベント送信先として Amazon Connect を有効にする半の「」を参照してください。CloudTrail が
SendIntegrationEventAPI からAccessDeniedExceptionエラーをスローする場合、ロールの設定が間違っています。 -
WhatsApp の電話番号が Amazon Connect インスタンスに正常にインポートされ、番号にインバウンド問い合わせフローが関連付けられていることを確認します。詳細については、「ステップ 2: 電話番号にインバウンド問い合わせフローを設定する」を参照してください。
-
インバウンドメッセージはまだサポートされていないため、ドロップされました。詳細については、「Amazon Connect での WhatsApp Business メッセージング機能と制限」を参照してください。